👥 Employees
The Employees page displays all supervisors and staff members who have access to the dashboard. You can create new supervisors and assign their permissions (rules/roles) that control what they can see and access within the dashboard.
Access:
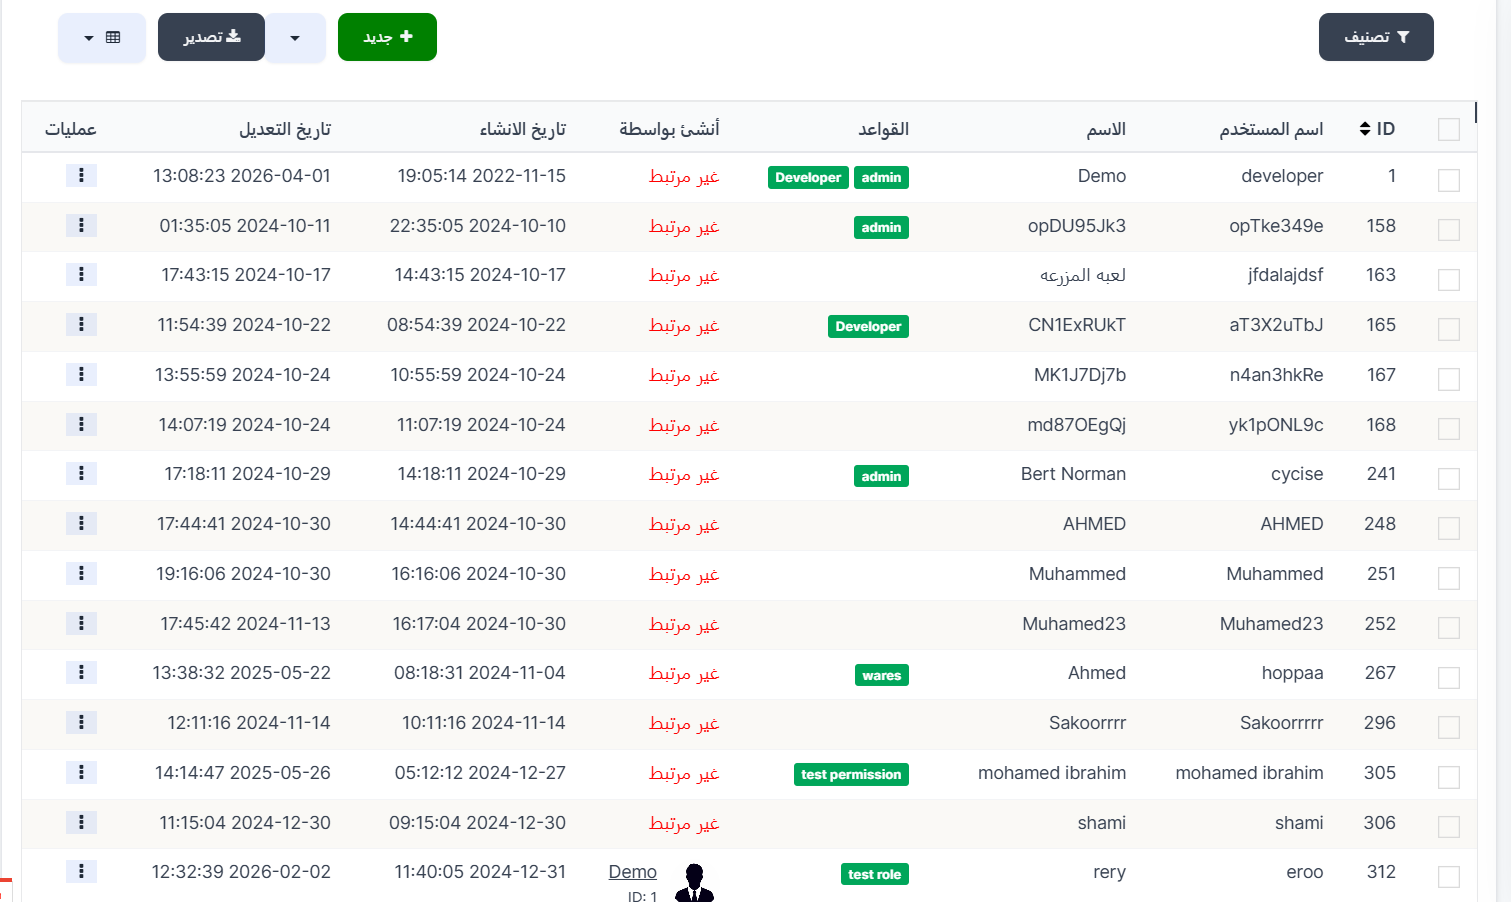
Sidebar → Employees and Permissions → Employees
Top Buttons:
| Button | Description |
|---|---|
| 🔽 Filter | Sorting and filtering options |
| ➕ New | Create a new employee/supervisor |
| 📊 Export | Export data |
Employees Table:
| Column | Description |
|---|---|
| ID | Unique identifier for the employee |
| Username | Login username |
| Name | Display name of the employee |
| Rules | Roles/permissions assigned to the employee — displayed as colored badges (e.g., Developer, admin, wares, test permission) |
| Created By | Who created this employee (or "Not linked" if not specified) |
| Created At | Account creation date and time |
| Updated At | Last modification date and time |
| Actions | Additional actions (⋮) |
Roles/Rules:
Each employee can be assigned one or more roles. A role defines the permissions the employee has — which pages and features they can access in the dashboard.
Role Examples:
| Role | Description |
|---|---|
| Developer | Full developer permissions |
| admin | Administrator permissions |
| wares | Store/merchandise management permissions |
| test permission | Test permissions |
| test role | Test role |
Note
- An employee without rules/roles will not be able to access any page.
- Multiple roles can be assigned to the same employee to grant multiple permissions.
- Roles and permissions are managed from the Roles page.
Create a New Employee:
Click ➕ New to create a new employee/supervisor.
Creation Fields:
| Field | Description | Required |
|---|---|---|
| Username | Username for logging into the dashboard | ❌ No |
| Name | Display name of the employee | ✅ Yes |
| Image | Employee photo — click 📂 Browse to select | ❌ No |
| Password | Login password | ✅ Yes |
| Confirm Password | Re-enter password for confirmation | ✅ Yes |
| Rules | Select roles/permissions for the employee | ❌ No |
| Select User | Link the employee to an app user — dropdown list | ✅ Yes |

Creation Steps:
- Click ➕ New
- Enter Username and Name
- Optional: Upload an Image for the employee
- Enter Password and Confirm Password
- Select the required Rules (roles/permissions)
- Choose the associated User from the dropdown
- Click Submit
Post-Creation Options:
| Option | Description |
|---|---|
| View | View the employee after creation |
| Continue Creating | Stay on the creation page to create another employee |
| Continue Editing | Go to the edit page |
Quick Summary:
| Action | Steps |
|---|---|
| View Employees | Employees and Permissions → Employees |
| Create Employee | ➕ New → Name + Password + Rules + User → Submit |
| Edit Employee | ⋮ → Edit |
| Assign Permissions | Edit → Rules → Select required roles |
| Manage Roles | Employees and Permissions → Roles |