📹 Zego Settings
Zego provides video and audio communication services, essential for features that require direct interaction such as group calls or live streaming within your application.
Step 1 – Open Projects Management
Access ZEGO Projects Dashboard
Go to the ZEGO Cloud Console: https://console.zegocloud.com
From the left sidebar menu, click: Projects → Projects Management
If this is your first time, you will see the message:
"Create your first project, and start your free trial."
Click the + Create button in the top-right corner to create a new project.
✅ This project will be used to integrate ZEGO Live Streaming services into your application.

Step 2 – Select Live Streaming Scenario
Choose the Project Type
After clicking + Create, you will be redirected to the Projects Creation page.
From the available scenarios, select:
✅ Live Streaming
This option is used to build:
- Interactive live streaming rooms
- Host and audience broadcasting
- Scalable real-time streaming
- Multi-user live sessions
The Live Streaming scenario is suitable for applications that require real-time audio/video room interaction.
After selecting Live Streaming, proceed to the next step to continue project configuration.
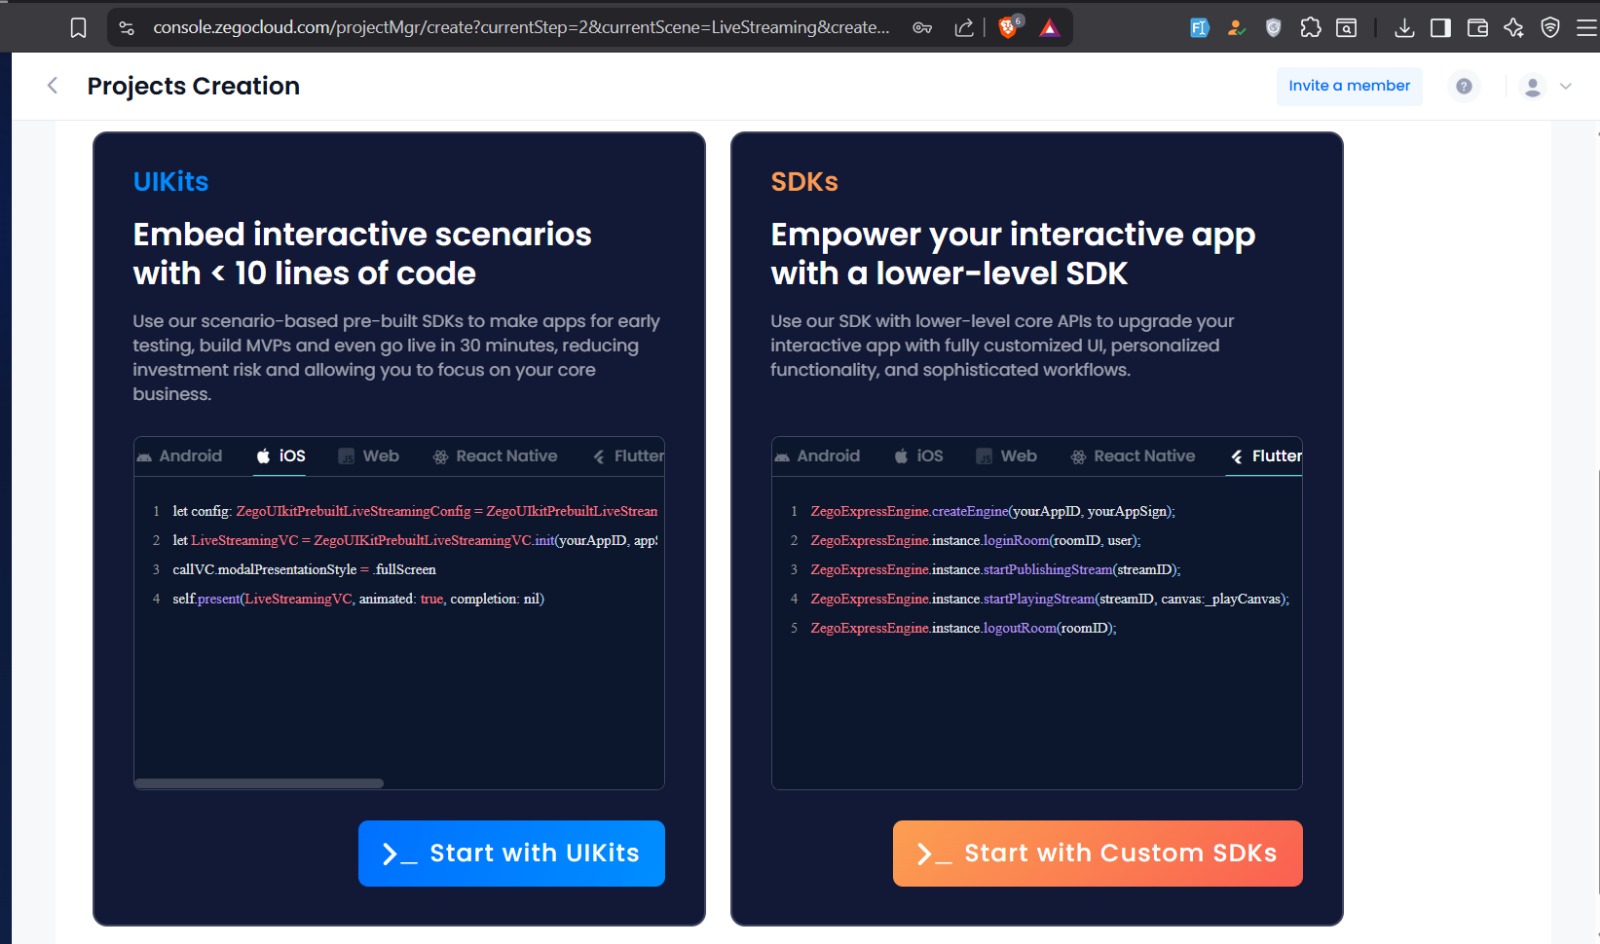
Step 3 – Choose Integration Method (UIKits)
Select UIKits for Faster Integration
After selecting Live Streaming, you will be prompted to choose the integration method:
- UIKits
- Custom SDKs
Select: ✅ Start with UIKits
Why UIKits?
UIKits provides:
- Pre-built live streaming interface
- Faster development process
- Minimal coding requirements
- Ready-to-use interaction features
- Reduced implementation time
UIKits is recommended when you want a complete live streaming solution with standard features and quick deployment.
After selecting Start with UIKits, continue to complete the project setup.
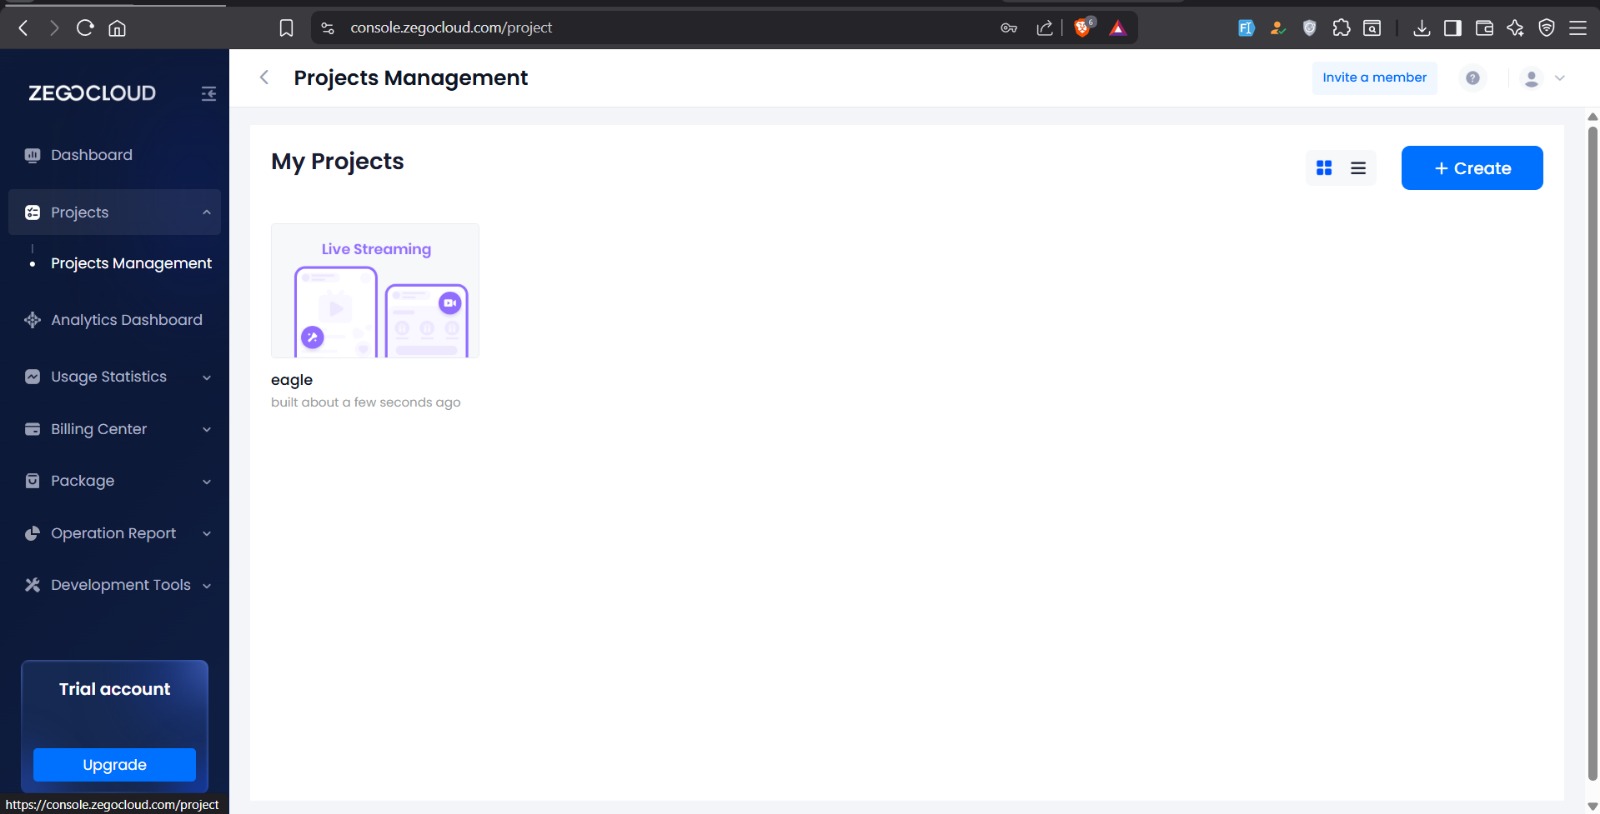
Step 4 – Return to Projects Management
Open Your Created Project
After completing the project creation process (UIKits + Live Streaming), the system may redirect you to additional setup pages.
However, for our integration, we do not need those steps. Instead:
- Go back to the left sidebar menu.
- Click Projects → Projects Management.
- Under My Projects, you will see the newly created project listed.
- Click on the project name to open it.
✅ From there, we will access the AppID, AppSign, and Server Secret, which are required for backend and mobile integration.
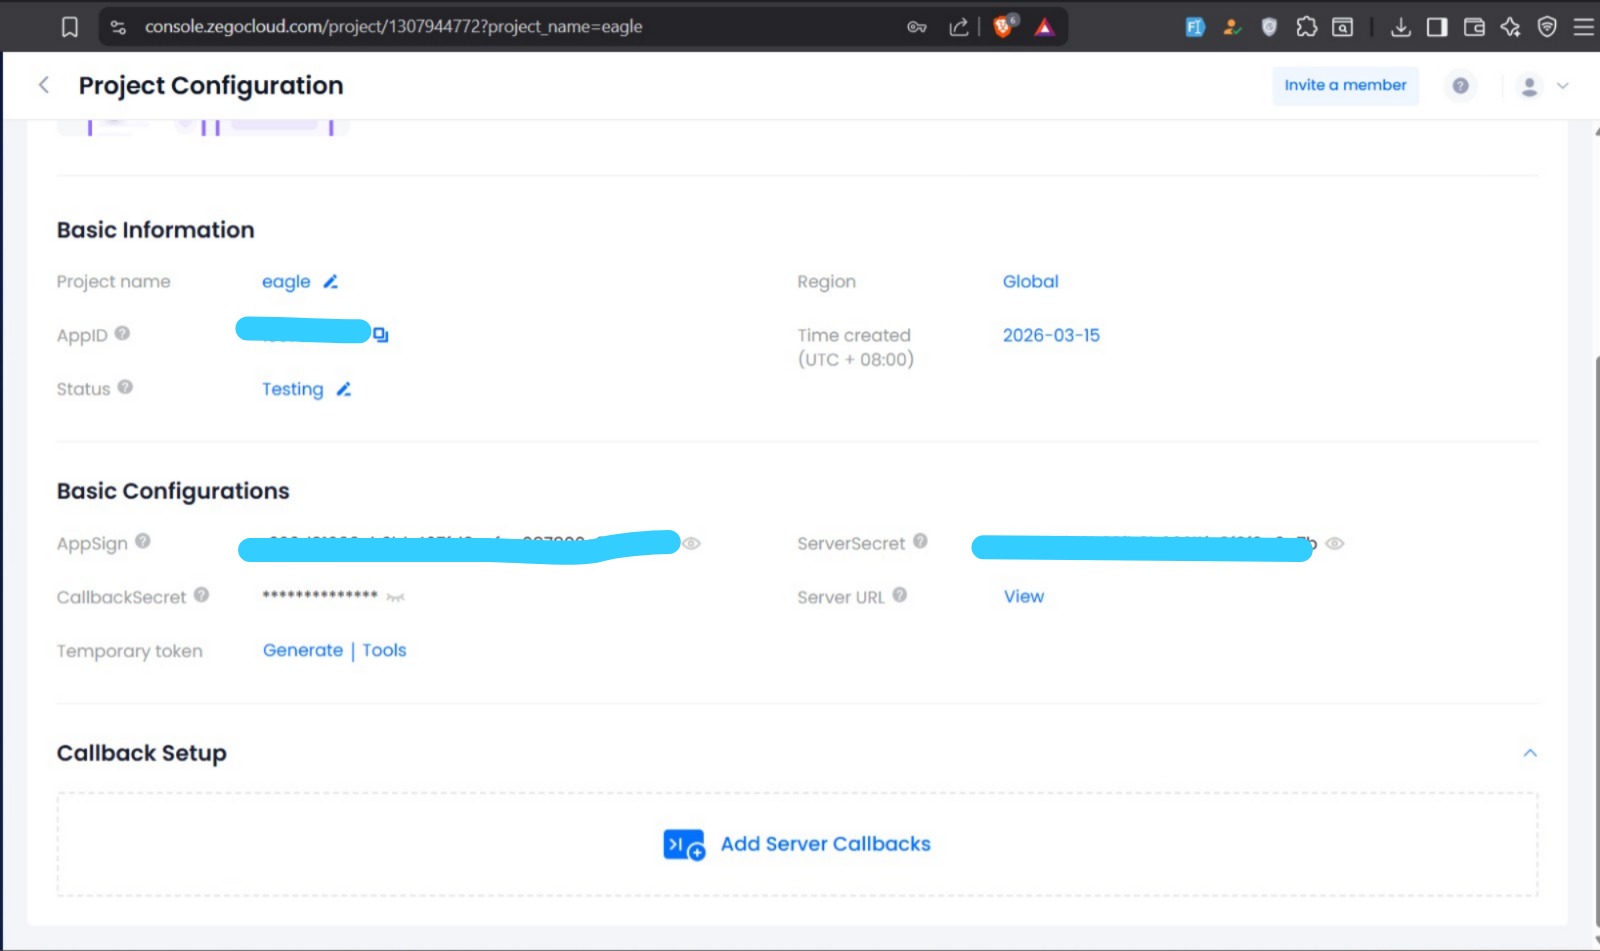
Step 5 – Copy Project Credentials
Access Project Configuration
After opening your project from Projects Management, you will be redirected to the Project Configuration page.
In this section, you will find the required credentials under:
| Section | Credential |
|---|---|
| Basic Information | AppID |
| Basic Configurations | AppSign |
| Basic Configurations | ServerSecret |
These credentials are required to connect:
- The mobile application to ZEGO services
- The backend server to ZEGO callbacks
⚠️ Important
Keep these values secure and do not expose them publicly.
Make sure to copy:
- ✅ AppID
- ✅ AppSign
- ✅ ServerSecret
These will be used in the next step inside the Admin Panel configuration.

Step 6 – Configure ZEGO in Admin Panel
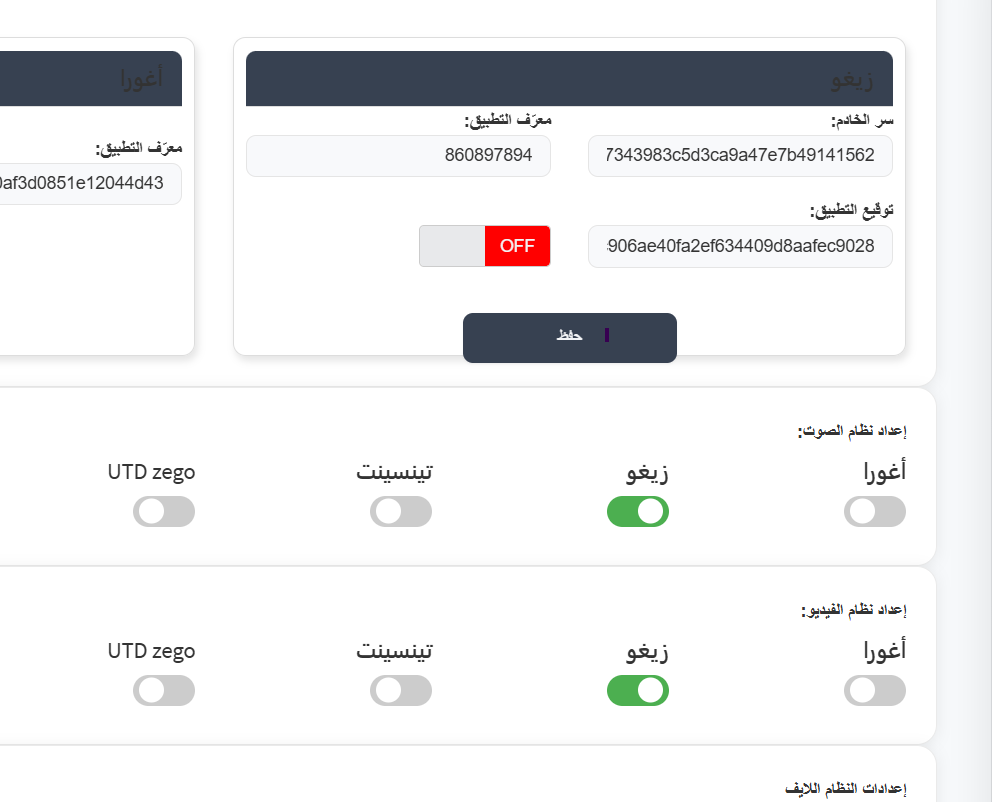
Add ZEGO Credentials to the System
After copying the AppID, AppSign, and ServerSecret from the ZEGO Console, open your system's Admin Panel and navigate to:
Settings → Zego Configuration (or Real-Time Settings)
Enter the following values:
| System Field | ZEGO Value |
|---|---|
| Server Secret | Paste the ServerSecret from ZEGO |
| App ID | Paste the AppID |
| App Sign | Paste the AppSign |
After entering all credentials:
- Make sure the ZEGO status is enabled (if required).
- Click Save.
✅ The system is now connected to ZEGO Cloud services.
This allows the application to:
- Authenticate users
- Create and manage live streaming rooms
- Handle real-time audio/video sessions
- Process server callbacks properly
Step 7 – Configure Server Callbacks
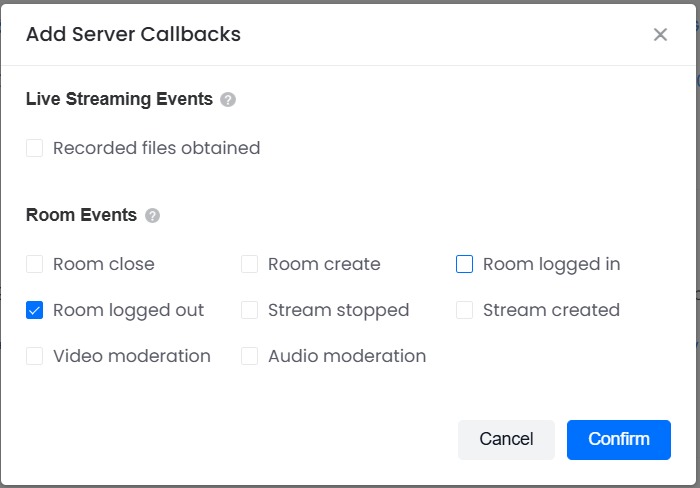
Add Room Event Callback
Inside the Project Configuration page, scroll down to the Callback Setup section and click:
Add Server Callbacks
From the available events, select:
✅ Room logged out
This event is triggered whenever a user leaves a live streaming room.
Why This Is Required
Enabling Room logged out allows the backend system to:
- Update room user count
- Detect when users leave a session
- Synchronize room status with the server
- Maintain accurate real-time room data
After selecting the event, click Confirm to activate the callback.
✅ The server will now receive notifications when users exit live rooms.
Step 8 – Add Callback URL
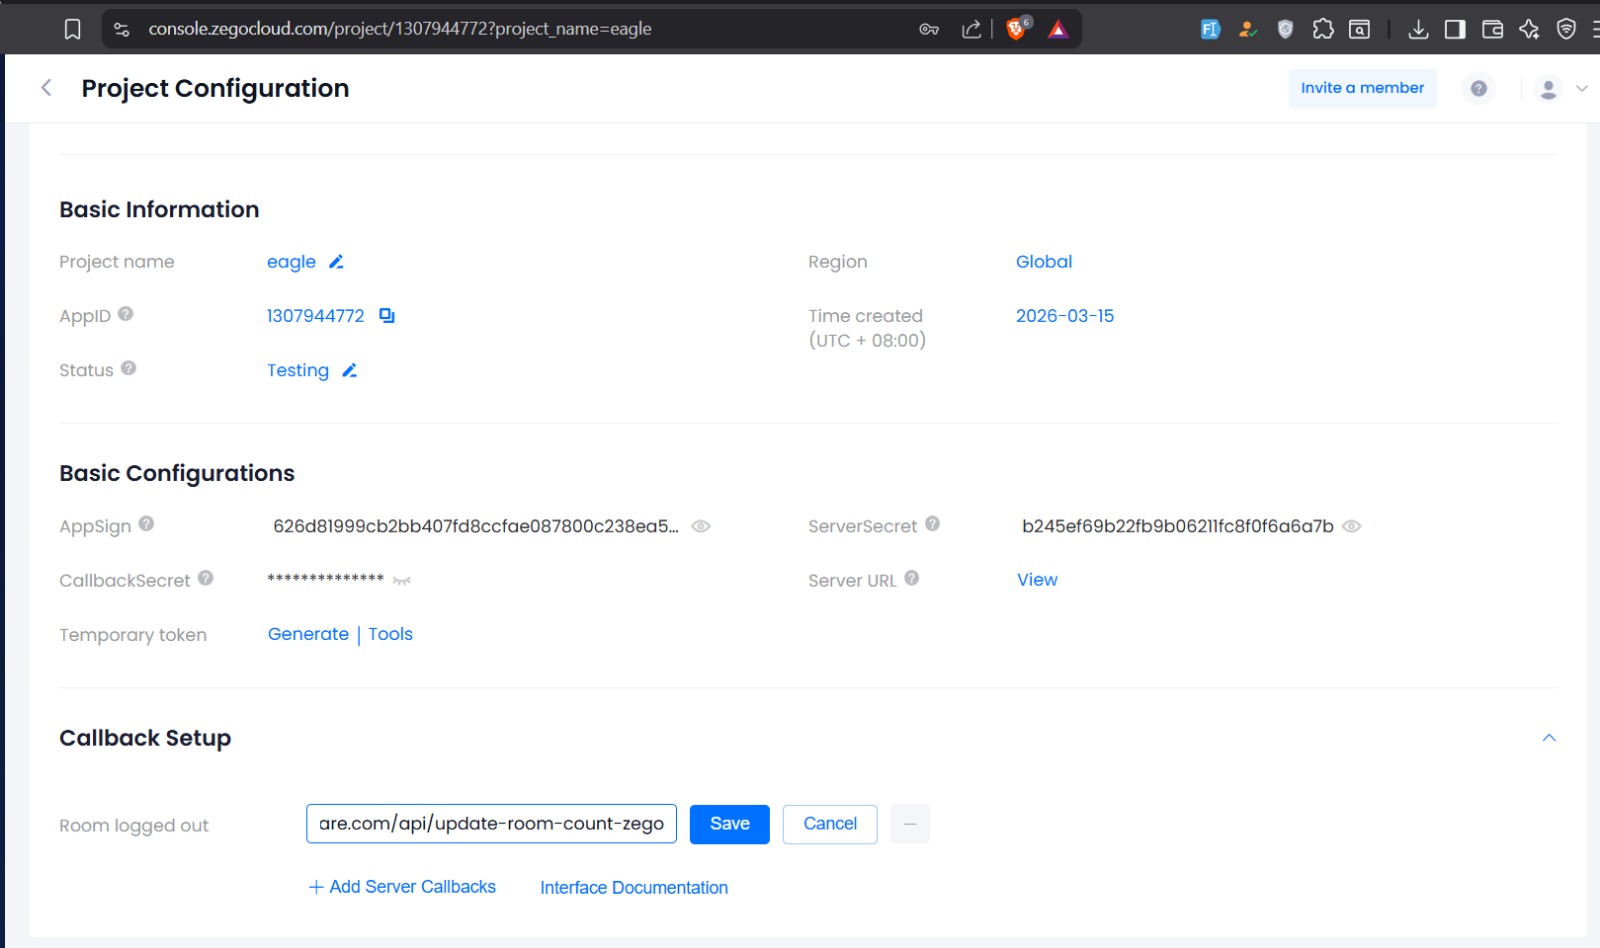
Configure the Room Logged Out Endpoint
After selecting Room logged out, return to the Callback Setup section.
You will see a field next to the selected event. In this field, enter your backend endpoint URL that will handle the callback.
Example:
BASE_URL/api/update-room-count-zego
Then click Save.
What This Does
When a user leaves a live streaming room:
- ZEGO sends a request to this URL
- Your backend receives the event
- The system updates the room user count
- Room status stays synchronized with real-time activity
✅ The callback is now successfully configured and connected to your backend system.
Tips:
- Make sure to obtain the correct App ID and App Sign from the Zego Cloud platform.
- Activate the Zego buttons in both Audio System Settings and Video System Settings to enable audio and video communication services.
- Test video/audio communication after configuration to ensure the service works.