🔖 Create Banner
This feature allows the Country Manager to create custom advertising banners that can be displayed in different locations within the app. Coins are deducted based on the selected display location, and Admin approval is required before the banner is published.
How to Access:
Country Manager Dashboard ← Banners Section ← Create New Banner
Phase 1: Creating the Banner
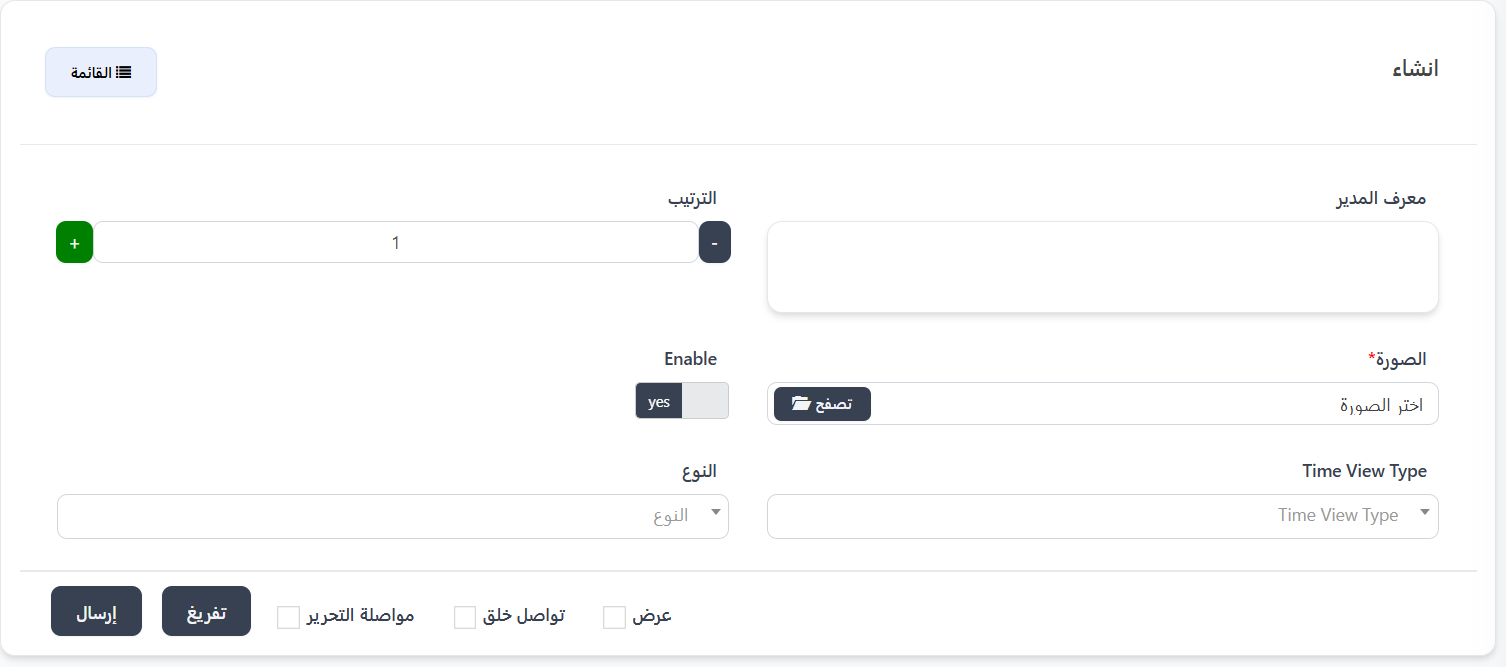
When you click "+ New" to create a new banner, the creation form appears with the following fields:
Creation Form Fields:
| Field | Description | Notes |
|---|---|---|
| Manager ID | Automatically filled with the current Country Manager's ID | Read-only field |
| Order | Determines the display order of the banner | Can be increased or decreased using (+) and (-) buttons |
| Image* | Upload the banner image | Required field - Click "Browse" to select the image |
| Enable | Enable or disable the banner | Choose yes to enable or no to disable |
| Type | Specify the banner type | Dropdown contains: Rooms, Events, Normal |
| Time View Type | Set the banner display duration | Dropdown contains: Hour, Day, Month |
Steps to Create a New Banner:
- Enter the Manager ID: Automatically filled or can be entered manually.
- Set the Order: Choose the banner's display order among other banners using (+) and (-) buttons. A lower number means it appears first.
- Upload the Image: Click the "Browse" button and select the appropriate banner image from your device.
- Enable the Banner: Select yes from the Enable toggle to activate the banner.
- Choose the Type: Select the banner type from the dropdown:
- Rooms: A banner related to rooms.
- Events: A banner related to events and activities.
- Normal: A general advertising banner.
- Set the Display Duration: Choose the time period for displaying the banner:
- Hour: Display the banner for one hour.
- Day: Display the banner for a full day.
- Month: Display the banner for a full month.
- Click "Submit" to save the banner.
Additional Options on Submit
- Show: Preview the banner after creation.
- Continue Creating: Create another banner immediately after saving.
- Continue Editing: Stay on the editing page after saving.
Phase 2: Selecting the Display Location in the App
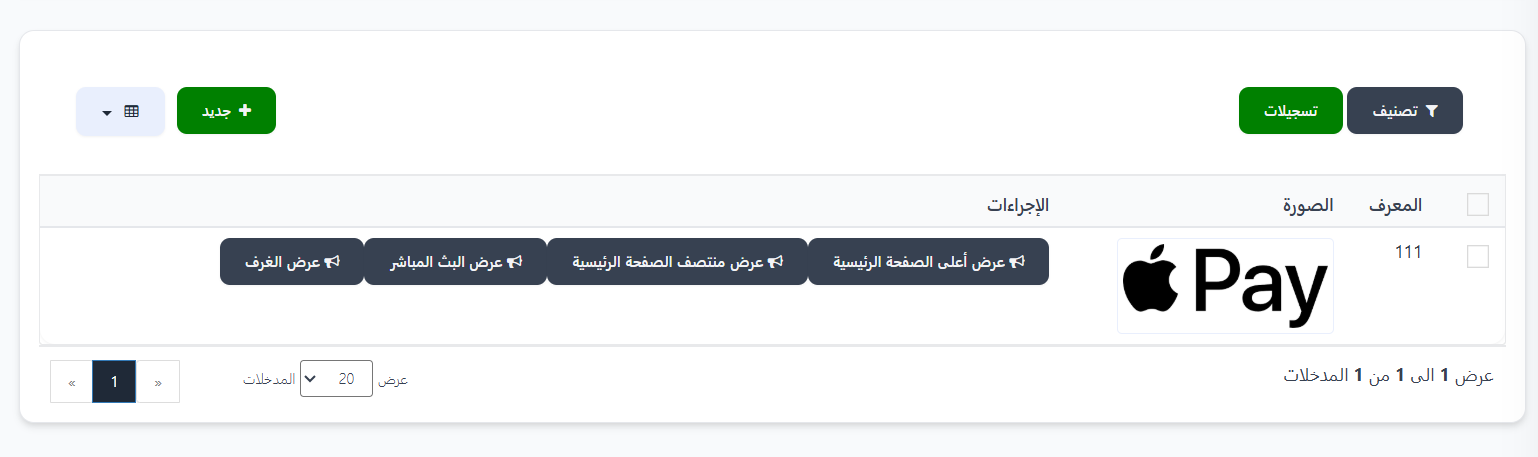
After successfully creating the banner, it appears in the banners list with its information (ID, Image). In the "Actions" column, display location buttons are available:
Available Display Locations:
| Display Location | Description |
|---|---|
| 🖼️ Display at Top of Homepage | The banner appears at the top of the app's homepage |
| 🖼️ Display at Middle of Homepage | The banner appears in the middle of the app's homepage |
| 🖼️ Display in Live Streaming | The banner appears in the live streaming section |
| 🖼️ Display in Rooms | The banner appears inside the rooms section |
How to Select a Display Location:
- From the banners list, find the banner you want to display.
- Click the appropriate button for the desired display location (e.g., "Display at Top of Homepage").
- A "Confirm Deduction" window will appear.
Phase 3: Confirming the Deduction and Paying Coins
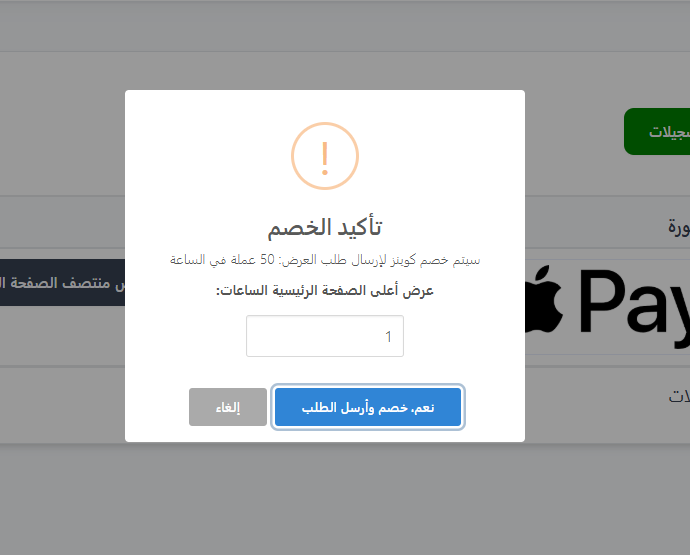
When selecting a display location, a confirmation window appears showing the following details:
Confirmation Window Contents:
| Element | Description |
|---|---|
| Display Price | Number of Coins to be deducted per time unit (e.g., 50 coins per hour) |
| Display Location | The selected location for the banner (e.g., Display at Top of Homepage) |
| Time Duration | Field to enter the number of time units (hours/days/months) |
Confirmation Steps:
- Review the deduction details shown (number of coins per time unit).
- Set the time duration required for display (e.g., 1 hour, 3 days, etc.).
- Click "Yes, Deduct and Send Request" to confirm the deduction and send the request.
- Or click "Cancel" to go back without deduction.
Important Warning
- The specified amount is deducted from the Country Manager's Coins balance immediately upon confirmation.
- Make sure you have sufficient Coins balance before sending the request.
- The deduction price varies based on the selected display location.
Cost Calculation Example
If the price for Display at Top of Homepage is 50 coins per hour, and you choose a duration of 3 hours, then 150 coins will be deducted from your balance.
Phase 4: Admin Approval
After sending the banner display request and deducting the coins, the banner is not published immediately. Instead, the request is sent to the Admin (Super Administrator) for review and approval.
Banner Request Review Page (Admin Dashboard):
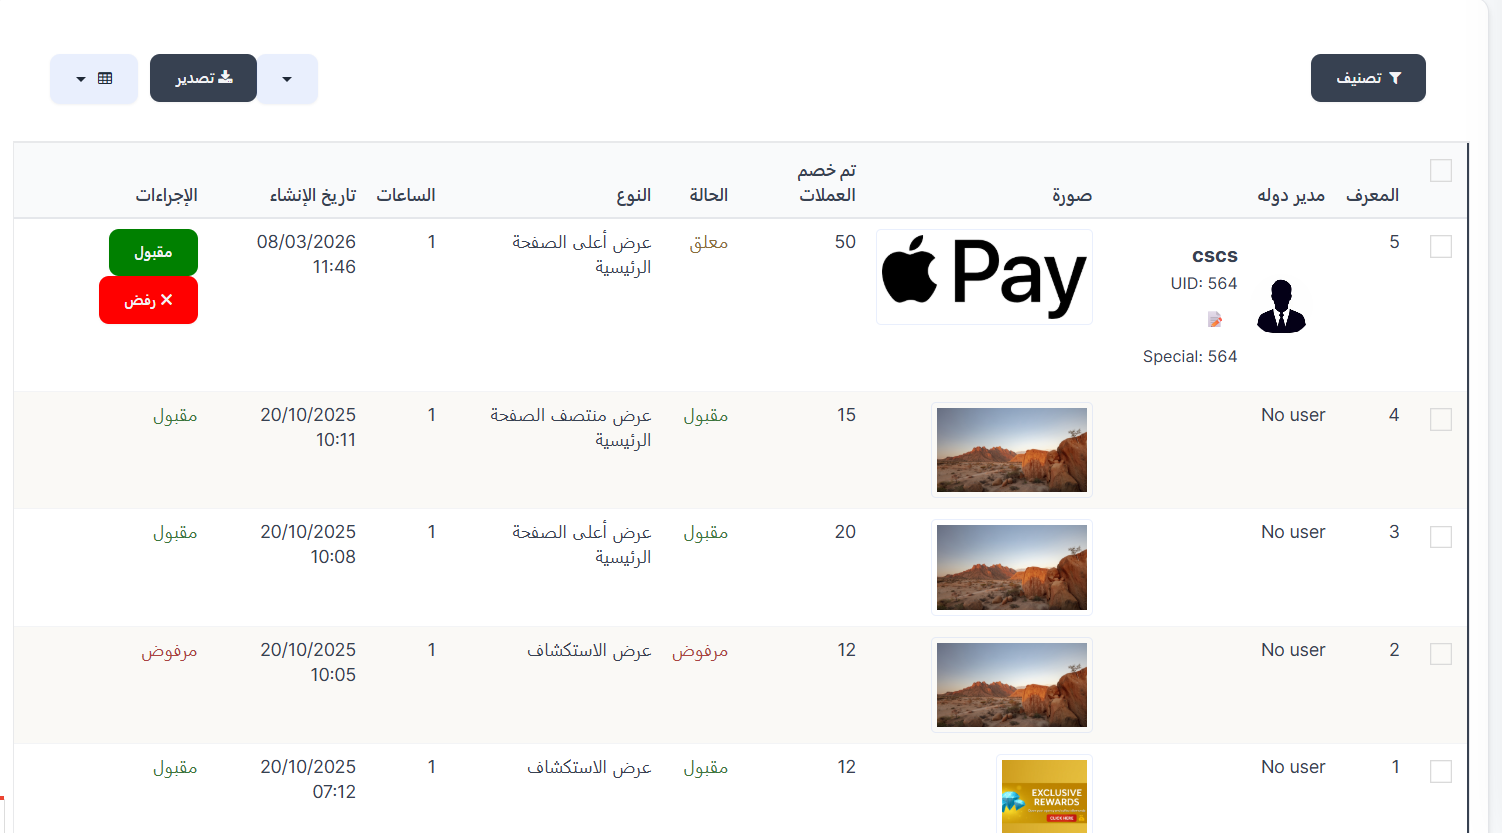
The Admin reviews all banner requests in a comprehensive table containing the following columns:
| Column | Description |
|---|---|
| ID | Unique identifier for the banner request |
| Country Manager | Name of the Country Manager who created the banner, with photo, UID, and Special number |
| Image | Preview of the uploaded banner image |
| Deducted Coins | Number of Coins deducted from the Country Manager's balance for this request |
| Status | Current status of the request (Pending / Accepted / Rejected) |
| Type | Selected display location (e.g., Display at Top of Homepage, Display at Middle of Homepage, Explore Display) |
| Hours | Number of hours/time duration requested for display |
| Creation Date | Date and time the banner request was created |
| Actions | Accept or Reject buttons (shown only for pending requests) |
Admin Actions:
When a request is in "Pending" status, the Admin sees two buttons:
- 🟢 Accepted: To approve the banner request and publish it in the specified location within the app.
- 🔴 ❌ Rejected: To reject the banner request and prevent its publication.
Note on Previous Requests
Requests that have already been acted upon (accepted or rejected) display their status in the "Status" and "Actions" columns without interactive buttons, serving as a historical record.
Request Status Stages:
| Status | Color | Description |
|---|---|---|
| Pending | 🟡 Yellow/Orange | The request has been sent and is awaiting Admin review - Accept and Reject buttons are shown |
| Accepted | 🟢 Green | The Admin approved the request and the banner will be displayed in the specified location within the app |
| Rejected | 🔴 Red | The Admin rejected the request and the banner will not be displayed |
Practical Example:
| ID | Country Manager | Deducted Coins | Type | Status | Action |
|---|---|---|---|---|---|
| 5 | CSCS (UID: 564) | 50 coins | Display at Top of Homepage | Pending | 🟢 Accept / 🔴 Reject |
| 4 | No user | 15 coins | Display at Middle of Homepage | Accepted | — |
| 3 | No user | 20 coins | Display at Top of Homepage | Accepted | — |
| 2 | No user | 12 coins | Explore Display | Rejected | — |
| 1 | No user | 12 coins | Explore Display | Accepted | — |
Note
- The banner will not appear in the app until the Admin approves it.
- You can track your request status from the banners list in the dashboard.
- In case of rejection, contact the Admin to find out the reason and resubmit the request after making adjustments.
- The Admin can export request data using the "Export" button at the top of the table.
- Requests can be filtered using the "Filter" button to show requests with a specific status (Pending/Accepted/Rejected).
Complete Process Summary:
graph TD
    A[Create New Banner] --> B[Upload Image and Set Configuration]
    B --> C[Save Banner]
    C --> D[Choose Display Location in App]
    D --> E[Confirm Coins Deduction]
    E --> F[Send Request to Admin]
    F --> G{Admin Review}
    G -->|Approved| H[✅ Publish Banner in App]
    G -->|Rejected| I[❌ Notify Country Manager of Rejection]
Important Tips:
Tips
- Choose a high-quality image suitable for banner dimensions to achieve the best appearance.
- Set the order carefully if you have multiple active banners; a lower number appears first.
- Choose the appropriate type (Rooms/Events/Normal) to target the right audience.
- Monitor your Coins balance before requesting display to avoid request rejection due to insufficient balance.
- Choose the appropriate display duration based on your budget and advertising campaign goals.